
How to Build In Sims 4 Like A Pro: All the Hidden Shortcuts You Need to Know
Do you want to learn how to build in Sims 4 like a pro?
The process can feel overwhelming at first with all the tools and mechanisms available. But once you learn the hidden shortcuts and small tricks, everything starts to click. You’ll be able to move objects freely, rotate furniture smoothly, resize items, and place floors with precision. Mastering Build Mode is what separates an average builder from a pro.
In this Sims 4 building guide, we’ll cover everything you need to know about building efficiently in The Sims 4, from moving and rotating objects, resizing furniture, raising and overlapping décor, to adding new floors and adjusting the grid size for perfect placement. By the end, you’ll be creating clean, aesthetic builds that look straight out of Pinterest, without wrestling with camera angles or snapping tools.
All the tips in this guide work on PC, Mac, and console, so you can follow along no matter your setup.
If you’re already a pro, click here to jump straight into Sims 4 building shortcuts.
Looking for the perfect CC for your Sims?
Try our Free Sims 4 Mod & CC Finder to discover thousands of mods instantly. Search by category, creator, or style to find exactly what you need!
Understanding Sims 4 Build Mode Basics
Before diving into shortcuts, let’s first learn how the Sims 4 Build Mode works. This is where you’ll design your house layout, place furniture, and customize every part of your home. Learning the basics makes using hidden tools and cheats much easier later on.
As a new player, you may find the various features of the Sims 4 Building Mode overwhelming, but I’ve broken down the basics below.
Switching Between Build and Buy Mode
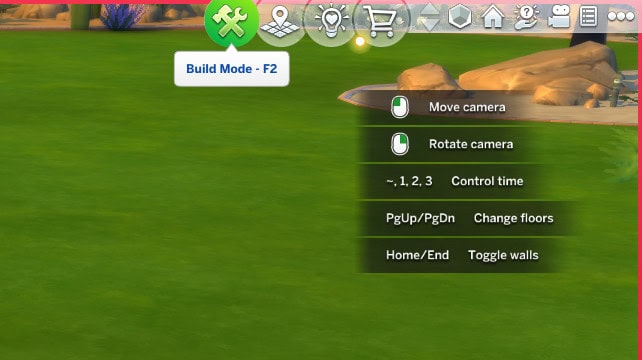
You can access Build Mode from Live Mode by clicking the hammer and paintbrush icon in the top-right corner or pressing F2 on your keyboard.
- Build Mode lets you create the structure of your home, including walls, floors, stairs, windows, doors, and roofs.
- Buy Mode focuses on interior items like furniture, décor, lighting, and appliances.
To switch between them quickly, press F1 for Live Mode, F2 for Build/Buy, and F3 to jump straight into the catalog.
Essential Tools You Should Know
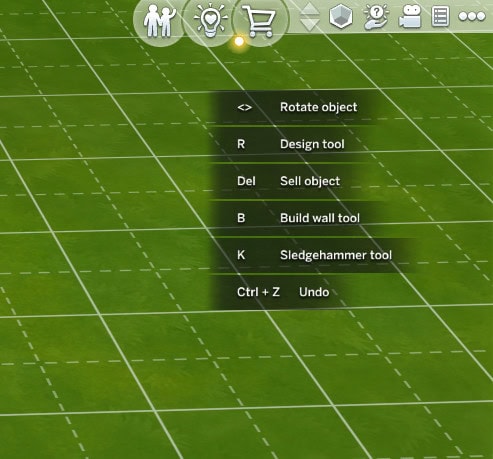
- Eyedropper Tool (E): Copies any object you click on so you can place duplicates instantly.
- Design Tool (R): Changes an object’s color or swatch without having to re-buy it.
- Sledgehammer Tool (K): Deletes any item, floor tile, or wall section in one click.
- Hand Tool (H): Picks up and moves furniture or decorations.
Use these tools efficiently to save a ton of time in your Sims game, especially when furnishing large builds.
Camera Movement Tips
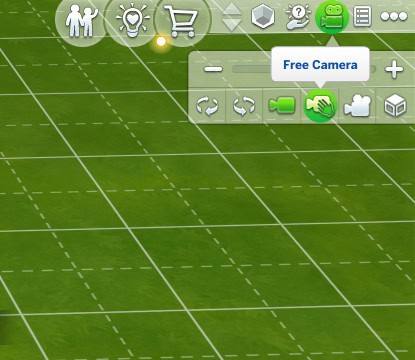
Press Tab to activate Free Camera Mode. This removes the UI and allows full control over camera angles. Using the free camera mode may be difficult at first, but the more you do it, the easier it becomes. And, it’s perfect for taking screenshots as it removes all the UI clutter.
- W/A/S/D – Move the camera forward, left, backward, or right.
- Q/E – Move the camera up and down.
- Mouse Scroll – Zoom in and out.
Helpful Tip: If your camera feels stiff, switch to The Sims 3 Camera in your game settings. It allows smoother rotation and finer control, especially when placing objects close together.
All the Shortcuts You Need to Know
If you want to build faster and more efficiently in The Sims 4, you need to know the right keyboard shortcuts. Most players only use the basics, but learning a few extra key combinations can speed up your workflow and make object placement much more precise.
Here are all the shortcuts we’ll cover:
- How to Move Objects Freely in Sims 4
- How to Rotate Objects in Sims 4
- How to Raise and Lower Objects in Sims 4
- How to Resize Furniture in Sims 4
- How to Overlap or Stack Items in Sims 4
- How to Change Grid Size in Sims 4
- How to Add Floors and Rooms in Sims 4
- How to Make Half Cabinets and Custom Counters in Sims 4
How to Move Objects Freely in Sims 4
By default, The Sims 4 snaps items to a grid, which keeps everything neatly aligned but limits creativity. If you want to place furniture at custom angles or position décor more naturally, you’ll need to use the MoveObjects cheat and the Alt key.
1. Enable Cheats
- Press Ctrl + Shift + C (or Command + Shift + C on Mac) to open the cheat console.
- Type testingcheats true and hit Enter.
- Then type bb.moveobjects and press Enter again.
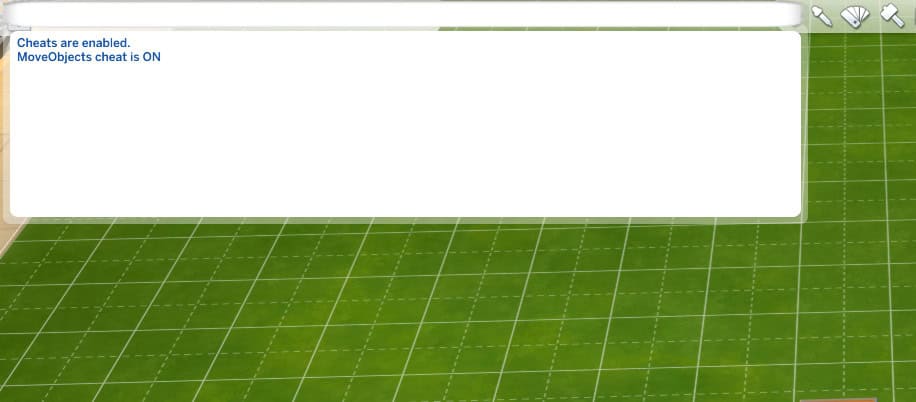
You should see a message confirming that the cheat is active.
If you want a more detailed step-by-step guide, read our article on How to Enable Cheats in Sims 4.
2. Move Items Off the Grid
Once the cheat is on, select any item in Build Mode and hold down Alt while dragging it.
- The object will now move smoothly without snapping to the grid lines.
- You can align chairs, clutter, or rugs perfectly, even diagonally.
- This trick is especially useful for creating realistic living rooms or layered desk setups.
3. Console Instructions
- On PlayStation: Press all four shoulder buttons (L1 + L2 + R1 + R2) to open the cheat bar.
- On Xbox: Press LT + RT + LB + RB together.
Then type in bb.moveobjects using the on-screen keyboard and confirm.
You can now use the thumbsticks to fine-tune object placement.
Helpful tip: Combine Alt + 9/0 (which we’ll cover below) to freely position items both horizontally and vertically, perfect for cluttered shelves or floating décor.
How to Rotate Objects in Sims 4

Rotating objects is one of the first skills you’ll use in The Sims 4. It allows you to correctly angle a sofa, align wall art, or adjust dining chairs around a table to suit your taste. I use rotation to make builds look natural and realistic.
Here’s how to rotate objects in Sims 4:
1. Rotate Using Keyboard or Mouse
- On PC or Mac, select any object in Build Mode and press the < or > keys to rotate it.
- You can also right-click the item to rotate it clockwise.
- Each press turns the object by 45°, snapping it to the grid for clean alignment.
2. Rotate Objects Freely (Off the Grid)
If you have MoveObjects enabled and hold down Alt, you can rotate items freely without grid snapping.
This gives you finer control over angles, so you can place rugs slightly askew, position plants, or create more organic layouts.
Example: When decorating a living room, try rotating rugs or coffee tables slightly to the side. It instantly makes the space look more natural and lived-in, like in real life.
3. Console Rotation
- PlayStation: Press R1 (clockwise) or L1 (counter-clockwise).
- Xbox: Press RB (clockwise) or LB (counter-clockwise).
- For precise placement, toggle MoveObjects and hold the thumbstick gently while rotating.
4. Pro Builder Tip
If your item won’t rotate as expected, check that it’s not attached to a wall or surface (such as a sink or mirror). You may need to remove it and rotate it before reattaching.
Also, objects only automatically rotate in eight directions unless the bb.moveobjects cheat is enabled.
How to Raise and Lower Objects in Sims 4
Sometimes you may want to raise or lower an object to achieve a particular look. For instance, you can make plants float on shelves, hang lights at custom heights, or stack clutter neatly on counters. Once you master this, your spaces will feel far more realistic and detailed.
1. Enable MoveObjects First
Before adjusting height, you need the MoveObjects cheat turned on.
- Open the cheat console with Ctrl + Shift + C (or Command + Shift + C on Mac).
- Type testingcheats true → press Enter.
- Then type bb.moveobjects → press Enter again.
You’ll get a confirmation message that MoveObjects is active.
2. Raise or Lower Objects
Once enabled, select any item in Build Mode, then press 9 to raise an object and 0 to lower it for precise placement.
Each tap adjusts the item slightly, allowing precise placement. Use this great feature to stack books, align wall art, or hang floating lights.
Tip: Hold Alt while pressing 9 or 0 for smoother vertical movement without grid snapping.
3. Console Controls
- PlayStation: Press L2 + R2 together and use the D-Pad Up/Down to adjust height.
- Xbox: Press LT + RT together and use the D-Pad Up/Down.
4. How to Use This Feature
- Float décor on top of kitchen counters or dressers.
- Align wall plants or photo frames perfectly.
- Stack boxes, books, or baskets for layered effects.
- Lower candles or clutter onto coffee tables for a more natural setup.
Pro Tip: Try combining 9/0 with Alt and MoveObjects. This lets you move items both vertically and horizontally with total freedom.
How to Resize Furniture in Sims 4
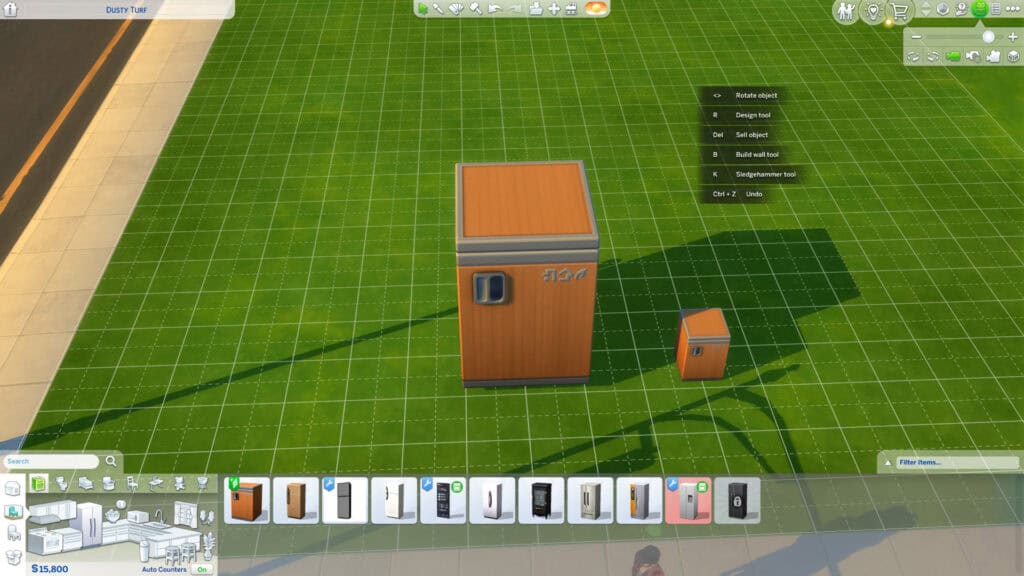
Resizing furniture is one of the simplest yet most powerful tricks in The Sims 4. It lets you adjust the scale of any object, so you can enlarge or shrink items. For example, you can enlarge plants for a dramatic statement or shrink décor to make it look more proportionate.
Once you learn this, you can completely change the feel of your builds without downloading extra CC.
1. Basic Resizing Controls
While in the Sims 4 Build Mode:
- Press ] (right bracket) to make an object larger.
- Press [ (left bracket) to make it smaller.
You can press the keys multiple times until you get the perfect size. The resize function works on almost everything: plants, décor, toys, rugs, and lights.
Helpful Tip: The resize tool doesn’t affect the item’s function, but only changes its visual size. For example, a resized fridge still works the same way.
2. Resizing on Console
- PlayStation: Hold L2 + R2 and press the Up D-Pad to enlarge or the Down D-Pad to shrink.
- Xbox: Hold LT + RT and press the Up D-Pad to enlarge or the Down D-Pad to shrink.
3. When to Use Resizing
- Decorating Walls: Scale artwork down for smaller rooms or scale it up for feature walls.
- Landscaping: Enlarge plants and rocks to fill space naturally without extra clutter.
- Storytelling Builds: Make toys or objects tiny to simulate a child’s imagination or dream sequence.
- Photo Setups: Adjust object proportions for perfect symmetry in screenshots.
4. Pro Builder Tip
If your resized item clips through walls or furniture, enable MoveObjects and adjust its position using Alt or the 9/0 keys. You can also layer resized items creatively, like stacking a smaller lamp on a larger one for a custom lighting look.
How to Overlap or Stack Items in Sims 4
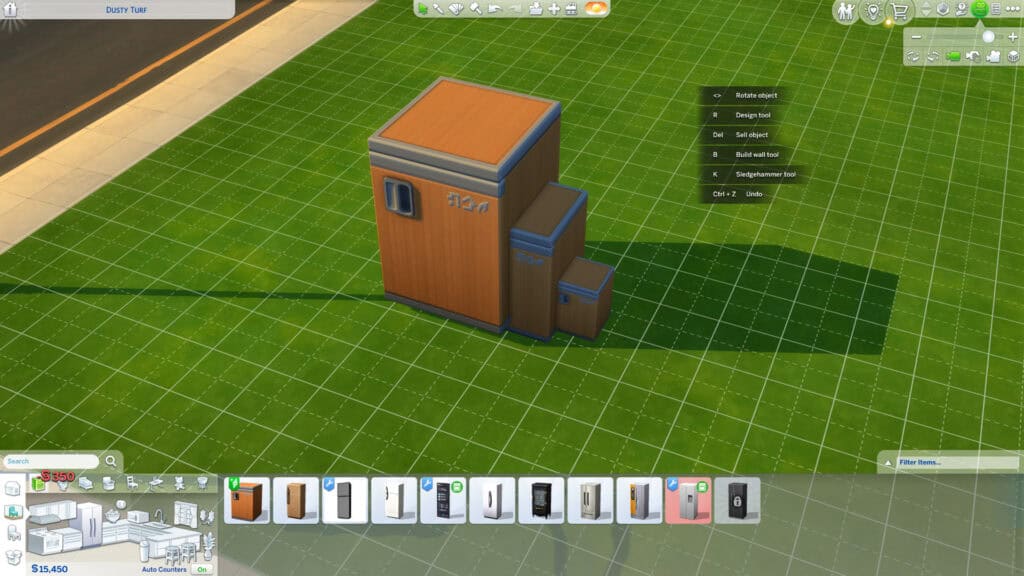
Have you ever seen shelves perfectly arranged together with decor and wondered how a creator made that? They use the overlapping and stacking objects trick, which instantly makes your builds look more detailed and realistic. It’s how creators make cluttered desks, layered rugs, and more.
By default, The Sims 4 prevents items from intersecting, but with a few shortcuts, you can override this limitation.
1. Turn On MoveObjects
You’ll need the MoveObjects cheat to place items in the same space:
- Open the cheat console with Ctrl + Shift + C (or Command + Shift + C on Mac).
- Type testingcheats true → press Enter.
- Type bb.moveobjects → press Enter again.
Once enabled, you can now move objects freely without the game snapping them apart.
2. Use the Alt Key for Precision
Next, select the item you want to overlap and hold Alt while dragging it.
- This lets you place objects smoothly without snapping to the grid.
- You can stack small décor pieces on surfaces like tables, counters, or shelves.
- Try layering books, candles, or plants to make realistic clutter setups.
3. Avoiding Clipping Issues
If two items visually merge too much, adjust one of them slightly using Alt and the arrow keys (or your mouse) to create subtle spacing. For items that disappear into each other, lower one with 0 or slightly resize it using [ or ].
4. How to Use This Trick
- Layer rugs for texture.
- Stack books and candles on a coffee table.
- Combine two plants to create fuller greenery.
- Stack crates, boxes, or suitcases to build realistic storage corners.
5. Console Users
- PlayStation: Enable MoveObjects using L1 + L2 + R1 + R2 → type bb.moveobjects.
- Xbox: Enable MoveObjects using LT + RT + LB + RB → type bb.moveobjects.
Then use the thumbsticks to fine-tune placement while pressing R3 to toggle between rotation and movement.
Pro Tip: For layered setups, place larger items first, then add smaller clutter pieces on top to create the illusion of depth. You can duplicate and tweak items quickly using Shift + Drag to fill spaces faster.
How to Change Grid Size in Sims 4
The build grid in The Sims 4 helps players align objects neatly, but sometimes you need more flexibility, especially when decorating small spaces or adding clutter. In this case, you can adjust or bypass the grid for a smoother, more natural layout and greater creative control.
1. How the Grid Works
By default, Build Mode uses a fixed grid system that snaps objects into even tiles. This ensures precise alignment of structural elements such as walls, windows, and furniture. However, for detailed decorating, snapping can feel restrictive. That’s where off-grid placement comes in.
2. Move Objects Off the Grid
To move items without grid snapping:
- Hold down the Alt key while dragging the object.
- The item will now slide smoothly, allowing micro-adjustments and diagonal placement.
- Release Alt when you’re happy with the position.
Tip: This also works while rotating items – hold Alt and use the rotation keys (< or >) to fine-tune angles.
3. How to Re-Enable Grid Snapping
If you want items to align perfectly again (like counters or windows), simply release Alt. The game automatically returns to the default snapping mode.
4. Advanced Grid Tricks
- Press G to toggle the visible build grid on or off.
- Use Ctrl + F when placing floor tiles to create diagonal halves for patterned designs.
- Combine Alt + MoveObjects to build “off-grid” entirely for organic, asymmetrical layouts.
5. Console Controls
- PlayStation: Hold L2 + R2 to toggle fine placement.
- Xbox: Hold LT + RT to move objects freely off-grid.
Pro Tip: Builders often use off-grid placement to make rooms look more lived-in. For instant realism, try rotating furniture slightly and shifting rugs just off-center.
How to Add Floors and Rooms
Did you know you can add floors and rooms in Sims 4?
Adding new floors or extra rooms lets you expand your builds vertically and design multi-level homes, lofts, or basements. Once you understand how floors work, you can create anything from simple bungalows to complex mansions.
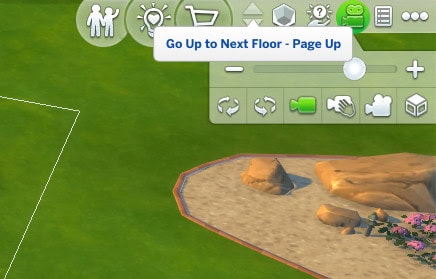
1. How to Add a New Floor
- Enter Build Mode and look at the floor level controls on the right side of the screen.
- Click the Up Arrow (▲) to move up one level.
- You’ll now see an empty grid where you can start drawing walls or rooms for your next floor.
- Use the Wall Tool, Room Tool, or Custom Room Tool to build your layout.
Tip: You can duplicate the floor below by selecting the entire room and using Shift + Click → Copy, then placing it above. This saves time when building symmetrical homes.
2. How to Remove Floors or Create Open Spaces
- To remove a section of flooring, click on it and press Delete or use the Sledgehammer Tool (K).
- Use this to create open-to-below areas, like stairwells, balconies, or loft-style living spaces.
- If you accidentally delete the whole floor, press Ctrl + Z to undo. Utilizing CTRL to delete walls streamlines the building process.
3. How to Add a Basement
- Press the Down Arrow (▼) twice to move below ground level.
- Use the Room Tool to draw your basement layout. The room tool allows players to drag out square or rectangular rooms.
- Add stairs to connect it to the ground floor.
You can use the basement as a gym, secret lab, or cinematic build.
4. Changing Floor Heights
When on any floor, click the Wall Height icon at the top left to adjust between Short, Medium, or Tall walls.
- Short walls make cozy, compact interiors.
- Tall walls create airy spaces perfect for luxury or modern homes.
5. Console Controls
- Use the Right Stick to move between floors.
- Press the Up or Down D-Pad to raise or lower levels while building.
When adding rooms and floors to your new house, use real-life floor plans as inspiration to enhance the realism of your build. There are also plenty of YouTube Sims building videos you can use as inspiration. The video attached below is an excellent example of how to build in Sims 4 like a pro.

How to Make Half Cabinets and Custom Counters

If you’ve ever wondered how builders create perfectly customized kitchens in The Sims 4, the secret lies in half cabinets and modular counters. These let you create professional-looking layouts with smooth transitions, corner pieces, and mixed heights, with no mods or game packs required.
1. How to Access Cabinet Variations
- Go to Build Mode → open the Kitchen category.
- Select any Cabinet or Counter.
- Turn OFF the auto counter.
I have a separate detailed guide on How to Make Half Cabinets in Sims 4. Please read it for the full step-by-step guide.
Tip: If the arrows don’t appear, make sure you’re using a base game cabinet or a compatible one from an expansion pack, not custom content without modular support.
2. Mixing Counter Heights
You can mix counter heights to give your kitchen a more dynamic, realistic design. For instance, use half-cabinets above windows for breathing space, and alternate tall and short cabinets for variety.
Also, try combining different swatches for a two-tone effect. It’s a subtle but professional touch that makes your interior design pop.
3. Aligning Counters Perfectly
If cabinets or counters refuse to connect neatly, try toggling MoveObjects off temporarily.
- Press Ctrl + Shift + C → type bb.moveobjects again to disable it.
- Place your cabinets, and they’ll correctly snap into shape.
- Once aligned, re-enable MoveObjects for any fine adjustments.
4. How to Use This Feature in Gameplay
- Use half cabinets above fridges or stoves for a built-in look.
- Stack smaller cabinets using 9/0 to create layered storage.
- Combine open shelving with half-cabinets for a modern, minimalist feel.
- Pair custom counters with island pieces to define your kitchen flow.
Pro Tip: Add clutter like dishes, plants, or coffee machines after you’ve set all cabinet heights. This avoids clipping and keeps your surfaces tidy. You can find clutter and decor objects for your build in our piece on Sims 4 Decor CC.
Sims 4 Build Mode Shortcuts Cheat Sheet
Here’s a summary of all the Sims 4 building mode shortcuts:
Action | PC / Mac Shortcut | Console (PlayStation / Xbox) | What It Does |
|---|---|---|---|
Open Cheat Console | Ctrl + Shift + C / Cmd + Shift + C | L1 + L2 + R1 + R2 / LT + RT + LB + RB | Opens the command bar for entering cheats. |
Enable Cheats | testingcheats true | Same | Unlocks advanced build cheats. |
Enable Free Placement | bb.moveobjects | Same | Allows objects to move anywhere without grid restrictions. |
Rotate Object | < or > / Right-Click | R1 / RB = Clockwise, L1 / LB = Counterclockwise | Rotates items at fixed angles. |
Move Object Freely (Off Grid) | Hold Alt | Hold L2 + R2 / LT + RT | Moves objects smoothly without snapping. |
Raise Object | Press 9 | Hold L2 + R2 / LT + RT + D-Pad Up | Moves the selected item upward (requires MoveObjects). |
Lower Object | Press 0 | Hold L2 + R2 / LT + RT + D-Pad Down | Moves the selected item downward. |
Resize Object | ] to enlarge / [ to shrink | Hold L2 + R2 / LT + RT + D-Pad Up/Down | Changes the object scale visually without affecting the function. |
Duplicate Object | Shift + Drag | Hold R3 (stick press) while dragging | Instantly copies an item. |
Delete Object | Delete / Backspace | Square / X (confirm delete) | Removes the selected object. |
Undo / Redo | Ctrl + Z / Ctrl + Y | L1 + R1 / LB + RB | Reverses or reapplies the last action. |
Eyedropper Tool | E | Y / Triangle | Copies the selected item for quick placement. |
Design Tool (Recolor) | R | N/A | Changes an object’s swatch or color. |
Sledgehammer Tool | K | X / A | Deletes multiple tiles, walls, or objects quickly. |
Camera Mode (Free Cam) | Tab | D-Pad Click + Right Stick | Activates free camera mode for screenshots. |
Toggle Build Grid | G | Not Available | Shows or hides floor grid lines. |
Diagonal Floor Tiles | Ctrl + F | Not Available | Creates triangular floor pieces for patterns. |
Go Up a Floor | Page Up | D-Pad Up / Right Stick Up | Moves the camera or builds focus one level higher. |
Go Down a Floor | Page Down | D-Pad Down / Right Stick Down | Moves the camera or builds focus one level lower. |
Save Game | Ctrl + S | Options / Menu | Saves your current progress. |
Building Tricks and Hidden Shortcuts
Now that you know how to move, resize, and stack objects, it’s time to take your builds to the next level. The Sims 4 includes several lesser-known tricks that can completely change how you design spaces, especially when combined with the shortcuts and cheats you’ve already learned.
1. Create Diagonal Floors
You can make diagonal or triangular floor tiles by pressing Ctrl + F before placing floor patterns.
- Each click rotates the triangle, allowing you to create geometric designs or angled hallways.
- This feature is excellent for patterned entryways, patios, or mosaic-style rooms.
2. Use Half Walls and Fences for Dividers
Half walls are perfect for separating rooms without closing them off.
- Go to Build Mode → Walls and Empty Rooms → Half Walls.
- Choose your height and drag it across the room.
You can even combine half walls with glass fences to create modern interiors or loft-style spaces.
3. Adjust Foundation Height
Foundations can instantly change the look of a build:
- Select the entire house or room.
- Use the Foundation Slider that appears to raise or lower the height.
- Adjust stairs automatically for easy access.
Use taller foundations for classic homes, and lower ones for sleek, modern builds.
4. Add Platforms for Split-Level Rooms
Platforms allow you to create tiered interiors, such as sunken living rooms, raised dining areas, or multi-level bedrooms.
- Select Platforms from the Build Menu and draw a section.
- Adjust the height using the up/down arrows.
- Add stairs or steps for seamless transitions between levels.
Tip: Platforms and foundations are separate tools — platforms only affect interior elevation.
5. Build Curved Walls and Rooms
Curved walls (added in a recent update) open new design possibilities.
- Choose the Curved Wall Tool, then select Small, Medium, or Large Curve.
- You can use these to make rounded bathrooms, cozy nooks, or bay windows.
Not all items snap perfectly to curves, so use MoveObjects to make adjustments.
6. Adjust Roofs and Angles
Click on any roof to access its shape handles. You can drag the arrows to change pitch, curve, or height.
- Combine roof types (gable, hipped, and half-gabled) to create unique silhouettes.
- Hold Shift while dragging to modify one side independently.
Pro Tip: For rounded or domed roofs, lower the edges slightly for a softer, realistic curve.
7. Unlock Hidden Objects
To access extra decorative items used by EA (like plants, signs, and clutter):
- Open the cheat console (Ctrl + Shift + C).
- Type bb.showhiddenobjects → press Enter.
- Then type bb.showliveeditobjects → press Enter again.
This unlocks hundreds of new items for landscaping, background décor, and realism in your builds. For instance, bb.showliveeditobjects reveals non-interactive items, such as landscaping details and vehicles. On the other hand, bb.showhiddenobjects unlocks hidden buyable items in the catalog.
8. Use the Eyedropper and Clone Tricks
- Press E to copy any object. This trick comes in handy when duplicating décor with matching swatches.
- Hold Shift + Drag to duplicate manually while placing.
- You can also Alt + Rotate to give each duplicated item a slightly different angle for natural variation.
FAQs
How do I go into Build Mode in Sims 4?
You can enter Build Mode by clicking the hammer and paintbrush icon in the top-right corner of your screen while playing, or by pressing F2 on your keyboard. This will pause Live Mode and open all the building tools you need to design or modify your house. On console, press the square button (PlayStation) or X button (Xbox) to switch to Build Mode.
How to build a house in Sims 4 for beginners?
Enter the Build Mode and select an empty lot. Use the Wall Tool or Room Tool to create the basic shape of your house. Then, add doors, windows, and a roof from the catalog. Once the structure is complete, switch to Buy Mode to furnish and decorate.
You can either use the base game items to decorate or download custom content for more creative builds. Don’t worry about perfection; begin with small, simple layouts and expand as you learn new tools.
How do you build freely in Sims 4?
To build without restrictions, you’ll need to activate a few cheats:
- Open the cheat console (Ctrl + Shift + C).
- Type testingcheats true → press Enter.
- Then type bb.moveobjects → press Enter again.
Once enabled, you can hold Alt while placing items to move them smoothly off the grid. You can also use 9 and 0 to raise or lower objects and [ or ] to resize them freely. This gives you total creative control.
How to turn stuff on in Build Mode in Sims 4?
To rotate objects, select the item and press the < or > keys, or right-click on PC/Mac. On console, press R1/L1 (PlayStation) or RB/LB (Xbox) to rotate clockwise or counterclockwise.
If you want free rotation without grid snapping, hold Alt while rotating. This lets you angle furniture and décor more naturally.
Conclusion
It will take a lot of practice, patience, and knowing the right shortcuts to master the building process in Sims 4. Once you get comfortable with free placement, object rotation, resizing, and height adjustments, you’ll start building faster and with more fun and creativity. What used to feel complicated will soon become second nature, and that’s when your builds really start to shine.
I hope you use these shortcuts and tricks to design like a pro. Don’t be afraid to experiment with overlapping décor, unique floor layouts, or bold color palettes. The Sims 4 gives you all the freedom you need to turn your vision into reality.
If this guide helped you, bookmark it for later or share it with your fellow builders. You can also tag your creations in the Gallery with #MHMBuilds (or your preferred blog hashtag) so others can check them out!
Happy building, and remember, there’s no wrong way to create when you have the right tools.